Lets Get Started:
Ok so start up a new project. Now the first thing I’ve done is create a pixel perfect camera so everything looks nice and crisp. If you haven’t read my Pixel Perfect Camera Tutorial I suggest you take a look at that first.
Everything nice and pixel perfect now? Good! Let’s move on.
Before we head any further, one thing you’re going to need is a Monospaced font. These are fonts that have a fixed-width and is something we’re going to take into account later on. You can find free ones online, and I’m sure you already have some installed onto your computer. “Courier” is a monospaced font.
Now let us take a second to think of what we want our dialogue boxes to have.
- Display text
- Display portrait
- Typewriter text effect
- Misc. other text effects
So now lets implement them in this order.
Display Text:
Create a new object, name it something like “obj_dialogue” and give it a Create event with this code:

message is an array containing all the messages you want to display.
message_current is the current message to display.
I’ll explain the rest of them later, for now this is all we need.
Now add a Draw GUI event and lets add some code to it.
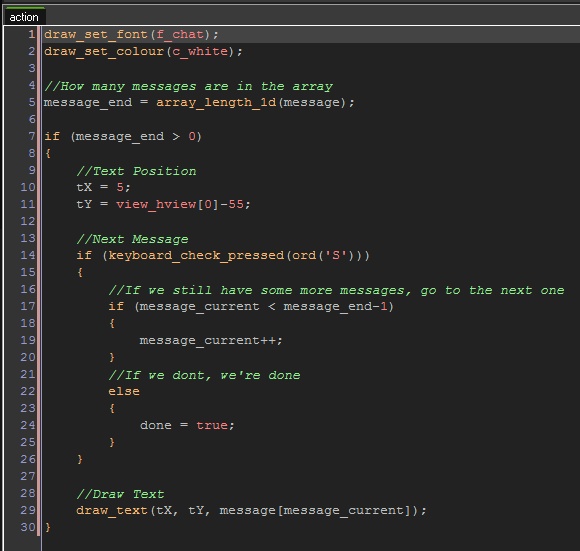
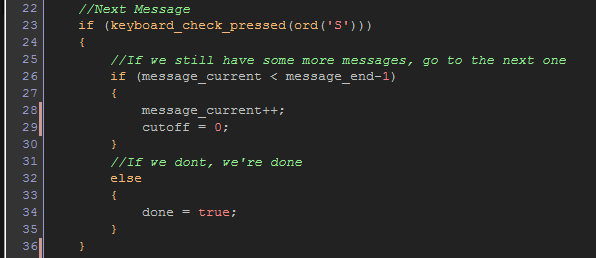
Comments in the code explain what each section does but here’s a summary: We create a variable (message_end) that stores how big the message array is. If its bigger than 0 we draw the current message. If the user presses S, we either go to the next message in the array, or we make done equal to true, which we’ll make destroy the object later.
and there we go, we now have it display text and scroll through each message when you press S.

Display Portrait:
Now we’re going to add portraits to the dialogue box.
If you take a look at the create event, you’ll see we have a “portrait” variable that is a string. We’ll make it so depending on what you set the variable to, it’ll display the corresponding portrait.
Open up the Draw GUI code and let’s add code under the Draw Text section.
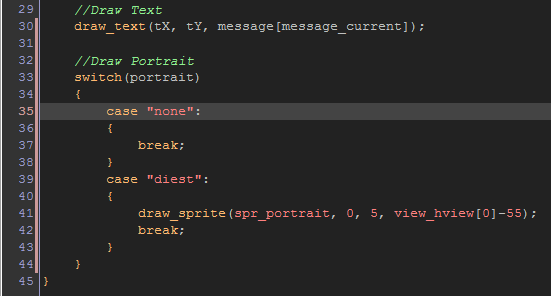
Here we added a switch statement which will read the “portrait” variable and then display the corresponding portrait and have the option to NOT display a portrait.
Also, we’ll adjust the Text Position section so the text moves over depending on if there is a portrait or not.

I have a sprite named “spr_portrait” which contains my self portrait (size 50×50), I changed the “portrait” variable to “diest” and here is the result:

Typewriter Text Effect:
This is where things get tricky. We’re going to make the text come in one character at a time. This can be done in several different ways (like adding to a string) but the way we’re going to do it is to draw each character separately. This way we can add cool effects later on as seen in the top gif.
Open up the Draw GUI code and we’re going to add/edit it.
We now need to add these variables to the top of the message_end if statement:
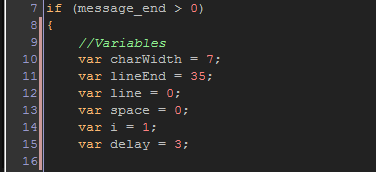
Remember when I said you’re going to need a monospaced font? Here’s why, we have a “charWidth” variable that is going to contain the fixed-width of your font (this entirely depends on the font you use and the size you set it. In my case the size is 8, so I set it to 7 just so the letters are close together but still readable.)
“lineEnd” contains the amount of characters you want in a single line. This way once a line contains more characters than this amount, it will go to the next line.
“line” is the current line we’re on.
“space” is like the character count. For example if the message is “Hello” then “H” is character 0, “e” is character 1, and so on.
we use “i” for looping purposes which you’ll see in a second. Almost like a for-loop.
“delay” is time delay we want before writing the next character.
Let’s implement this.
Add this code somewhere within the message_end if statement:

Now we’re using the “cutoff” variable. This is the variables we’re going to use to cutoff the current message and write out each character. Since we start at 0, it will write 0 characters. When the timer goes off cutoff will equal 1 and it’ll write 1 character, and so on.
Let’s make that happen.
Edit the Draw Text section to this:
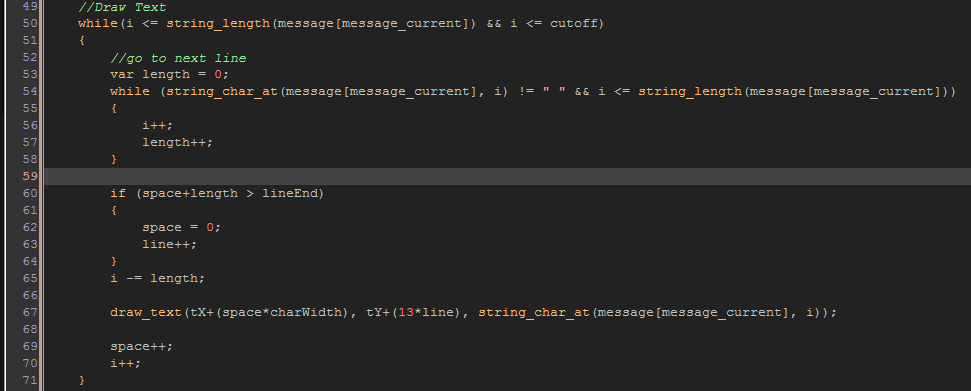
So now we’ve added a While loop to the Draw Text section. Remember we need to draw each character in the message individually, so we’re going to need a loop for this.This while loop only runs if “i” is less/equal to the length of the message AND less/equal to “cutoff”. So if the length of the message is 20 but the cutoff is 5, it will only display 5 characters.
First thing we do inside the while loop is check to make sure the current word doesn’t surpass the “lineEnd” variable, and if it does we go to the next line.
Now the “draw_text” function no longer draws the entire string, it is now drawing each character individually, so we have to manually space them out.
“tX+(space*charWidth)” is doing exactly this.
Remember “space” is like the character count, so we multiply this by the charWidth. So if “space” is equal to 3 and charWidth is equal to 7,
7 X 3 = 21, so the third character will be 21 pixels to the right of the tX position.
ALSO, we have to reset the “cutoff” variable back to 0 when we go to the next message, so add that to this section:
Once we do all this, we increment the “space” and “i” variables to move on to the next character. Here is the result:

Other Text Effects:
Now that we are drawing each character separately, we can add effects on each character with a little effort.
First thing we need is some sort of way to let our system know what effects we want on which characters. Let’s implement something I call a “modifier.”
add this code inside the while loop that draws each character:

Here we are checking our message for a modifier. As you can see, my modifier is a backwards slash. You can make it anything you want, but I suggest you use a special character that you wouldn’t regularly use in your game dialogue.
Basically how this will work is we will set a modifier to the text we want with effects. So if we want an effect on the message “Hello World!” we’ll change it to “\1Hello World!”
As you can see, in the if statement we have two “++i” so the modifiers will not be displayed when we draw the text.
Now lets make these modifiers actually do something.
First lets add normal, no effect text.

We have a modifier for normal plain text. This will be done by the modifier “\0″ so an example of this would be “\0Hello World!”
Now lets add another modifier.
How about shaky text?

What we’re doing is adjusting the X and Y position of each shaky character by adding to it with “random_range(-1, 1)” and we implement this by adding “\1″ to the section we want shaky.
So if you want a combination of modifiers, we’ll do something like:
“\0Hello \1World\0!”
And now adding this to your message array will result in:

Finished!
And we’re done! You can now add any modifier you can think of. Change the text color by adjusting the “draw_set_colour” function, or whatever else!
Please let me know if you guys have any questions or anything is unclear. Also it’d be awesome if you could share this.

hi! for some reason, when i try to implement the text effects, i have a debug error saying i haven’t declared the modifier variable, any chance you can help me out?
You forgot to declare the modifier variable 🙂
I have a problem with modifiers, i cannot make more than 10, is there a solutuion
one solution would be to read in letters rather than numbers, if you want to try that!
Sometimes the first letter of the next line shows up on the previous line, I’ve changed multiple things, but nothing works. I’ve tried adding \n in the code, more spaces, but it won’t work.
Example:
THIS IS TEST CODE A
AND I DON’T KNOW W
WHAT TO DO AAAAA
Is there a solution to this?
unfortunately I can’t really provide any help without taking a look at your code.
How would I be able to change the text speed at which the text shows up at? I want to add pauses at the sections where the character “,” or “.” pauses for a second. Thanks.
hey, i followed the tutorial exactly, but whenever i use a second modifier (ie, not the one at the start of the messages), it draws the backslash. any ideas as to why this is, exactly?